Note

NOTE: Most recent posts are shown first. Please use navigation at right to start at the beginning (December 2014)
Showing posts with label build. Show all posts

Friday, February 12, 2016

One Year Update- Gauges, Wheels

Last Sunday was the one year anniversary of getting the F100 Interceptor on the road!  Can't believe I've been driving it that long already.  With spring just over a month away I've started on the projects for this year.   I have a list of things I'd like to accomplish before May: Body in decent shape (maybe even some paint), bed floor installed, front suspension improvements (camber reduction at full drop), and some changes to the seating. That will be covered in future updates but for now lets go over the things I have already started work on.  You can also check out my Instagram for more frequent pictures.

Gauges
Since the swap I've been using the stock Crown Vic gauges, trimmed down and stuffed in the dash behind a cut up stock bezel.  Functional, but not much to look at.  Here's the Vic gauges:

I really wanted something that didn't stand out as obviously out of a newer car, and had even taken apart a spare Vic cluster to try to mount the gauges individually behind smaller cutouts.  It would have been a ton of work and still not really been what I was looking for, so I started looking at aftermarket gauges.  I couldn't find anything on the net from someone using aftermarket gauges in a Crown Vic, so I had to just figure it out on my own.
I found a pin out wiring diagram for the gauge cluster connectors here, checked the wiring diagrams in my electrical manual, and saw that the gauges seem to work pretty much like any aftermarket gauges.  They get key on power and ground, and a signal from a sending unit.  Having no experience with this sort of thing I figured I better test it out and found a cheap used Dolphin Gauges programmable electronic speedometer on eBay.  I hooked some jumper wires into the Vic gauge harness and went for a drive and the needle moved.  I followed the calibration instructions and it was accurate.  Success!  But now I needed, at a minimum, a gas gauge and water temp gauge.  Some research revealed that late model Fords use a sending unit with an ohm range of 16-158 ohms.  Dolphin doesn't make such a thing so I found some Classic Instruments gauges that were close to my Dolphin Gauges speedometer, and added a couple dual needle air pressure gauges for the bags.  But then the Dolphin speedo looked mismatched so I ended up finding a Classic Instruments vintage series speedo on closeout that matched the other gauges. Turns out the new speedo is a little pickier about speed signal so it required a $100 adapter.... let's just say this didn't end up being the cheap way to go.  But I am happy with how it looks:

Still wiring up the warning lights (check engine, brake warning, OD off, high beam, etc) but I should have those in this weekend.

If I was to start over right now I'd probably go with Auto Meter gauges, they seem decent and are relatively inexpensive.  Here's some examples of basic black and white gauge setups, with current prices at Summit Racing.  I'm sure they could be found at Amazon, Jegs, egauges.com, etc.

Basic aftermarket gauge package for 03-05 crown vic
White Auto Meter Phantom SeriesBlack Auto Meter Tradional Series
SpeedometerATM-5888$233.95ATM-2489$213.97
Water TempATM-5737$62.95ATM-2532$57.97
Fuel LevelATM-5718$53.95ATM-2518$48.97
$350.85$320.91

These are electronic programmable speedos that should work with the signal in an 03-05 Crown Vic, and the gas gauges are compatible with the Vic sending unit.  The temp gauges should work, but if they don't worst case is you have to add their temp sending unit and wire it in.
If you want to incorporate air gauges I'd recommend the Viair 90083 for a white gauge setup, it's only $36.  RideTech makes a nice looking black gauge but it's $80, there's probably a cheaper option out there.
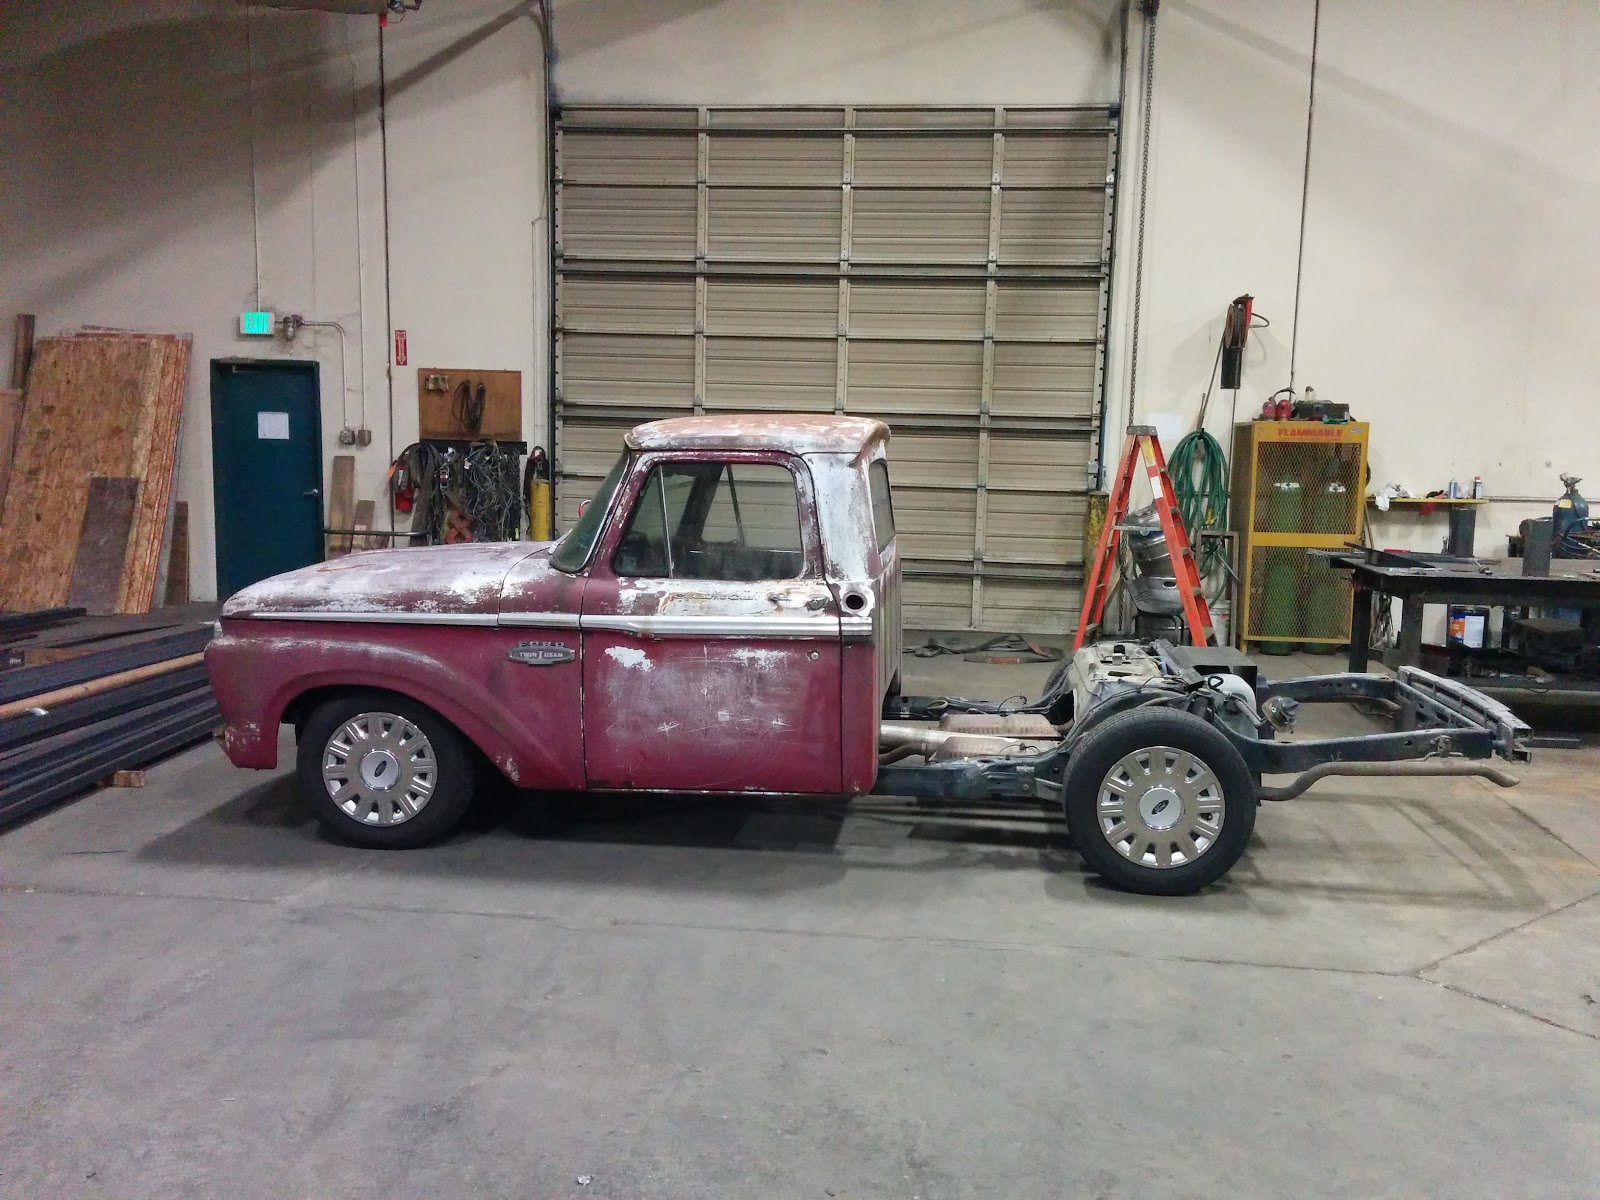
Wheels
Another thing I've been wanting to update is my wheels, and I needed new tires so figured I better have them mounted onto something I liked. There is not a lot of room with how wide the Crown Vic is compared to the truck.. Pretty much anything besides the stock 16x7s with 54mm positive offset would hit the fenders.  So I tried to find something that looked good but was still fairly close to the stock wheel offset.  I focused on late model Mustang wheels, as they have similar offsets.  After much research I settled on some 17x8 Bullitt wheels, with 45mm offset. These can be found very cheap, a lot of people take them off late model Mustangs when they upgrade to larger wheels.  I found them for $63/each, including shipping.  They were nearly brand new with less than 5 miles on them.

I went with a slightly narrower tire than stock Vic, and a little shorter- 215/50-17.  This would help my clearance issues a little.  Still, I needed another 3/4" clearance out back so I cut the fender up to flare it a little.  I still have a little more work to do but I was able to make them fit.  I think it's a huge change, very happy with the look:


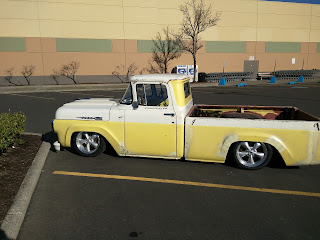
I'm planning to make some new videos covering the progress on my truck as well as Troy's '66 very soon, they will be on my YouTube channel in the near future and I will put them up here as well.

Friday, August 14, 2015

Six month update

I've been driving this thing for six months now, racking up a little over 6,000 miles, and figured it's long overdue for an update.
Lots of little details have been taken care of since my last post- Carpet is in, windows & door locks working good, wiring has been cleaned up, the cutout in the bed floor covered, some of the body work on the bed & a cab corner are done (thanks to Troy), exhaust has been through several iterations, and I even entered it in a car show and received an award!  Here's a few pictures I've taken along the way...

Drove in the Paddy Hough Parade with the Slo Poks 

Took a little time off my project to give Troy a hand building his own "Cruck", which is what we've taken to calling these Crown Victoria trucks.  His is a '66 F100 on an '05 Police Interceptor frame.  


Got a new engine cover, added trim rings and center caps to the stock Vic steel wheels


Went to the Portland Transmission Warehouse show, Troy's truck made it's first appearance as well


Picked up a different steering wheel at the Portland Swap Meet, I think it's a big improvement


Threw in a temporary wood cover in the bed to keep things from falling out 


Went to a Slo Poks Alley at Troy's, showed the truck off to a few guys that were interested in the details


Crystal & I took the truck to the Clatskanie Cruisers annual car show.  It was a great show, I plan to go again.  I even won an under construction award, sponsored by the Clatstkanie Volunteer Firefighters Association


Troy helped me out with a cab corner and started body work on the front passenger side of the bed


I installed rear air suspension out of a civilian Crown Vic (police models have extra stiff springs in the rear).  I don't have it set up to go up and down quickly, but it does allow me to adjust the ride height as needed.  There's quite a bit of travel.


I also cut the front springs down a bit since the police cars sit higher than normal, and swapped out the chrome center caps for some chrome lug nuts.  I don't have a lot of wheel options and the tires are good, so I'm trying to do what I can to make them look decent.

Made a quick video to show the new ride height


I also took the truck on it's first big road trip, but I'll save that for the next post...


Saturday, February 28, 2015

Taillights, mirrors

Haven't posted much lately, been too busy driving it!  I have made a couple of minor improvements-  Replaced the mirrors, installed some '50 Pontiac style tails, tweaked the timing and shift points, rebuilt the passenger door internals so the window goes up and down... minor stuff.  Mostly I've just been out driving it and enjoying it.  Here's a few pictures for now.

'50 Pontiac tails


And here's the original tail light style, it's a big improvement

A picture from Red Door Meet in Portland


Went to Cars & Coffee with Troy & Wendy


And a picture from Dave, he had the cool bug parked next to me

Thursday, February 12, 2015

Sunday, February 8, 2015

Bed and Front Bumper Installation

Yesterday was the two month anniversary of this project, and boy was it a long day.  At this point I can officially call the swap complete... there's still body work left to do and other improvements to be made but everything is put back together solidly and I the two vehicles have been merged into one.  On to yesterday's accomplishments...
I met Troy at his work at 8:00.  First we got the bed up on a table and cut out a section for the rear end/gas tank hump:


Next came the task of widening the fenders.  We needed close to an inch on each side to allow for the wider track of the Crown Vic.  The stock fenders curve in towards the tire, we needed to make them more or less vertical.  I'll let the pictures do the talking here:


There will be some further welding and shaping needed later, but this gave the clearance needed.
After some test fits we figured out where to cut the rear frame off and build new frame pieces.  Unfortunately I didn't get pictures of the new rear section, but I will try to get under the truck and add them later.


This all took longer then expected, so I forgot to keep snapping pictures.  After the new frame section was built we test fit the bed, got it square and level, and fabricated mounts in the four corners.  The bed was bolted into place and Troy got to work fabricating a front bumper mount while I wired up the rear lighting.  We probably should have saved the bumper for another day, but we were getting so close to done we had to push on.  Finally, at 7:00 in the evening, it was all back together:


So happy with how it sits, this project has far exceeded my expectations.  It's amazing how far it has come in two months, and it never would have been possible without all of Troy Jackson's hard work, knowledge, and skilled fabrication.

Today I did tie up another loose end, mounting the Vic gauge cluster in the dash (it had just been sitting in there).  I trimmed the cluster down, cut out the stock dash bezel, put a thin sheet of lexan behind the bezel, then secured the cluster.


Maybe someday I'll get some retro styled gauges, but for now it gets the job done.

I also added an extra touch, just something to hint at what's going on underneath this old truck:


This is the Police Interceptor badge I hacked off the trunk of the donor car.
That's it for now, I will try to get a walk-around video up in the next few days and will continue to post when I have major changes to report.  But mostly I'm just going to get out there and drive it around every chance I get!
Feel free to ask questions or request pictures in the comments of any post and I will be happy to help.

Thursday, February 5, 2015

Bed shortened

Been working on lots of little stuff, but nothing picture worthy- painting the new sidesteps, replacing rear rotors, changing around the wiring under the hood a bit, etc.  Last night i was able to meet Troy at his work and we made some good process finishing up the shortening of the bed.

I had decided that taking 8.5" out of the rear, along with the 3.5" we already removed from the front, would look the best using some crude photosshopping.  This would bring it down to a 7' bed.  The stock long bed was 8', the short bed models are 6.5'.  The short beds I've seen in pictures don't look quite right, they are just a bit too short and their tail light panel is too long.  I think when it's all finished up it will look like it should have come that way from the factory.

First we marked off the 8.5" and started cutting:


The 8.5" section removed...


The rear section was hung and clamped in place while we fixed the gap all around, then on to tacking it in.


As you can see there is a big difference between the transitions at the bottom of the bed side.  We brought the rear part down a bit and the front up a bit until they met in the middle:


It will still need a little shaping but it is solid now and can wait until after the bed is on the truck.
Here's a picture of the shortened bed:
 

Up next will be flaring the fenders and installing the bed.  It will finally be a truck again!