Documenting my project to swap a 1960 F100 onto a 2003 Crown Vic Police Interceptor frame with running gear
Note
NOTE: Most recent posts are shown first. Please use navigation at right to start at the beginning (December 2014)
Saturday, June 25, 2016
Friday, June 24, 2016
Hood, Bumper, Seat, Bed
Time for an update! There's really nothing major left to do on the truck so I've mostly just been driving & enjoying it, I've put about 15k miles on it so far. I have been slowly making minor improvements to some areas that were bothering me, so here's what's been going on.
57/58 Hood:
Hood
I've never been a huge fan of the hood on this truck. From the front it looks like it's not latched. I much prefer the looks of the 57/58 hoods, which are a little tough to find in good condition. Luckily there were a couple for sale at the Portland Swap Meet this year, and I picked one up. What I didn't realize was how tough it would be to find an emblem for it... I managed to modify the emblem from my '60 hood and it's actually starting to grow on me, even though it's way larger than the correct emblem would be. It'll work for now. Here's a couple pictures:
Original hood:
Rear Bumper
When I got the truck it had a huge monstrosity of a step bumper, which I scrapped right away. Kind of a shame, because it probably would have went well with the overall look of the truck today. I looked into stock bumpers, but they are chrome and really don't flow with the look of the truck. And they are never available used. So I kept scanning CL, and swap meets, until at the Portland swap meet I found a late 60's Ford truck front bumper. For $15, it was worth a shot.
Obviously too wide, and too chrome, but that's fixable. I took a few inches out of it, cut off the parts that would normally wrap around the sides of the truck, fixed a dent and some holes, and painted it up. Here's some pictures of the progress:
And here's the final look on the truck, taken while I rolled through Red Door Meet:
Another thing you might notice in this picture is the bed side is no longer various colors of primer... I had some paint mixed to match the existing yellow, and touched up the spots where the bed was shortened and the fenders were widened. I don't have any plans to paint the whole truck, but I also didn't want it covered in primer spots. I'm pretty happy with it now.
Seat
In a previous post I covered the installation of some bucket seats... in a parking lot... in Reno... They were comfortable for two but just no good when I want the wife & son with me. So I found a late 70's Ford truck seat that was pretty comfortable and picked up replacement upholstery from Raybuck. I think it looks great, and it's very comfortable.
Bed
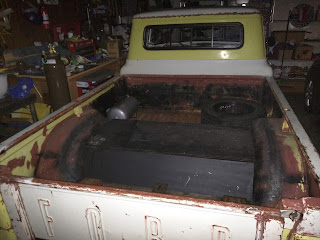
One of the first things that people notice on the truck is always the giant hump in the middle of the bed. One of the downsides to putting your truck on a car frame, there's a big kick up over the rear axle. In this case the gas tank is under there too. I shrouded it with some sheet metal and a wood access cover last year, but it's something I've been wanting to change up.
I considered making a better looking shroud, but I really didn't like a hump in the middle. Generally when I'm hauling anything fairly big its sheets or planks of wood. So I decided to just make a false floor, all one depth. I made a framework of 1x1 and 1x2 tubing, used s couple sheets of plywood to make the floor, painted it up, and added bed strips for a sort of a classic wood bed look.
The center section is removable with a few screws. Ahead of the hump I left storage for my spare tire, tools, air tank, and compressor. Behind the hump, accessed through the tailgate, is basically a "trunk" that will be enclosed for dry storage.
It's shallow, but I'm going to build some removable stake sides I can use when I need the extra depth.
That's about it for now as far as recent updates go. My next big change will be finding a 98-02 rear end, which is several inches narrower, so I have more clearance for the rear wheels. I really should have done that in the first place, and I would recommend this to anyone attempting a similar swap. I also plan a higher rear end ratio and limited slip while I'm at it.
In closing, here's a few recent pictures I've been collecting. Feel free to check out my Instagram for more, @mtnjasons:
Subscribe to:
Posts (Atom)


